Feature
Functionality Description
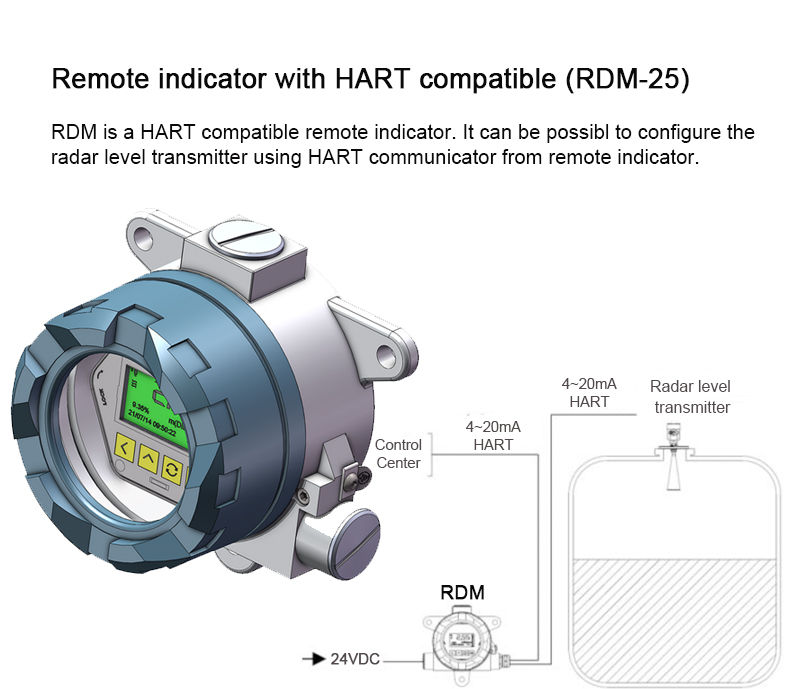
- Remote Indication and Configuration
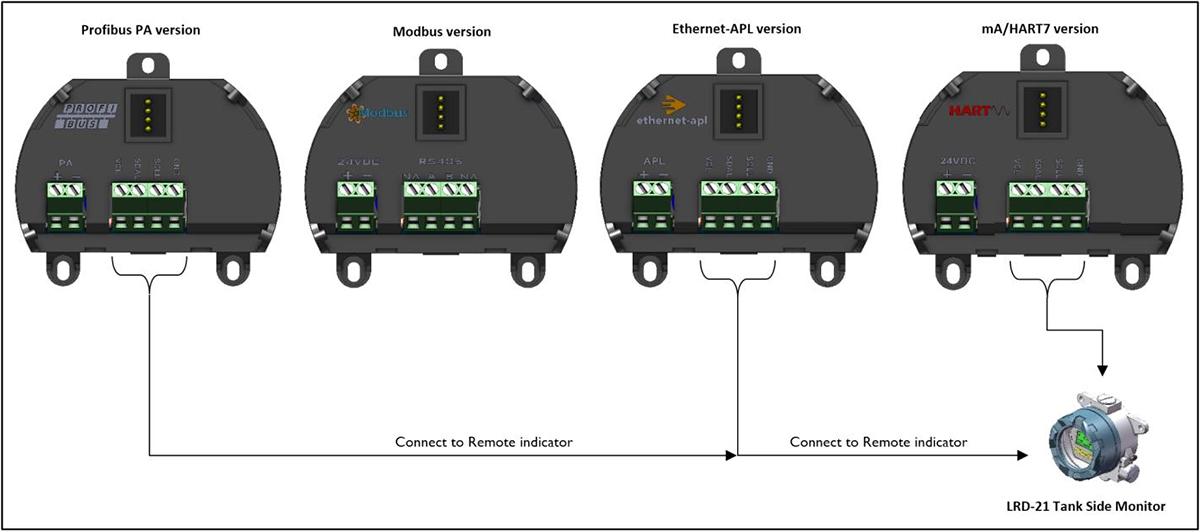
- HART Compatibility: The tank-side gauge (such as the RDM model) is a remote indicator compatible with the HART protocol, allowing users to remotely configure and monitor the radar level transmitter via a HART communicator.
- Real-time Data Display: Displays real-time level measurements from the radar level transmitter, ensuring operators are kept informed about tank levels at all times.
- Communication Capabilities
- Enables data exchange with the radar level transmitter through the HART communication interface, supporting read and write operations for convenient parameter setup and data retrieval.
- Environmental Adaptability
- Designed with consideration for complex industrial environments, featuring dustproof, waterproof, and corrosion-resistant properties suitable for harsh operating conditions.
Installation
Installation Instructions
- Selection of Installation Location
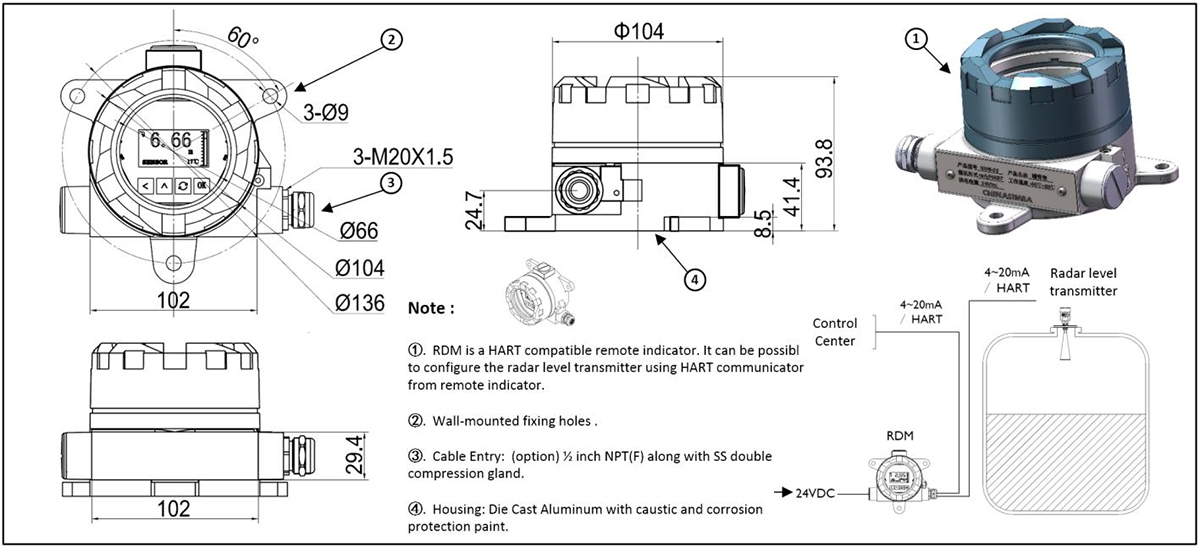
- Install the tank-side gauge in a readily observable and accessible location, typically on a wall or column near the storage tank and with good lighting.
- Mounting Method
- Wall-mounted Fixing Holes: The tank-side gauge is equipped with wall-mounted fixing holes on its back. Use the provided mounting bracket and screws to securely attach it to the chosen location.
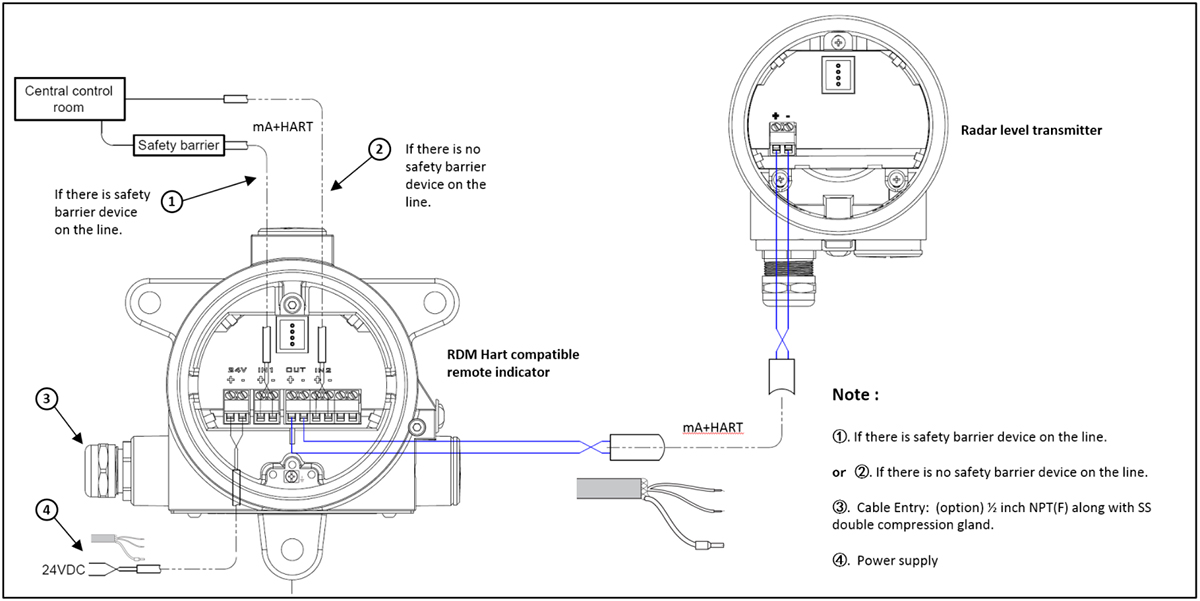
- Cable Connection
- Cable Entry: The tank-side gauge features a cable entry point that offers an optional ½ inch NPT(F) connection complete with a stainless steel double compression gland.
- Cable Attachment: Insert the signal cable from the radar level transmitter into the cable entry of the tank-side gauge and secure it using the double compression gland to ensure a reliable connection.
- Power Supply Connection
- Connect the appropriate DC power supply to the tank-side gauge based on its power requirements, ensuring stable and reliable power supply.
- Parameter Setup
- Use a HART communicator to connect to the tank-side gauge and configure the radar level transmitter according to actual needs, such as setting the measuring range, units, output signals, etc.
- Debugging and Testing
- Upon completion of installation, conduct functional testing to verify that the tank-side gauge correctly displays measurements from the radar level transmitter and communicates seamlessly with the HART communicator.
- Routine Maintenance
- Regularly inspect the tank-side gauge’s fixing to ensure no loosening or detachment.
- Clean the tank-side gauge’s surface to prevent dust and dirt accumulation from affecting display clarity.
- Regularly check cable connections for any looseness or damage.
Note:
- Strictly adhere to relevant safety operating procedures during installation and usage to ensure the safety of personnel and equipment.
- For any issues encountered, promptly contact technical professionals for assistance.
Dimensions

0.00 USD
The ANL-9080N100 regular version non-contact radar level transmitter has an 80GHz Frequency FMCW radar system, and is applicable to measurement in liquids and solids with a nozzle diameter being at least 100 mm. It is suitable for dust applications and liquids heated with steam. The lens material can be PTFE or PEEK, and the maximum measuring range is 80 meters. It also has a low-temperature version, with the material using N60.

0.00 USD
ANL-9080N30 regular version Non-contact Radar Level Transmitter, is a precision measurement device designed for various applications in liquids, solids, stirring, and corrosive environments. Leveraging an 80GHz Frequency FMCW radar system, it offers reliable and accurate level measurements, ideal for small tanks in chemical industry reaction tanks, reactors, and beyond.

0.00 USD
The ANL-9080N50 radar non-contact level meter is a high-performance device equipped with an 80GHz FMCW radar system, designed for both liquid and solid measurement applications. Ideal for use in chemical industry reaction tanks, reactors, and even steam environments, it offers exceptional reliability and accuracy. With its variety of specifications, including PTFE and PEEK lens antennas, multiple signal output options, and wide-ranging power requirements, the ANL-9080N50 adapts to a diverse range of industrial scenarios.
